National Park Tour: What I packed for our 2-month, cross-country camping trip!

On June 21st, 2017, we packed our family-of-four in a little Toyota Prius and headed out on a two-month, cross-country, National Park Tour. Our plan was to hit 10 - 15 parks out west, and camp out all along the way. 

So that's 2 months, 14 parks, 9500 miles... with 4 people in a Prius. 

But let me step back a bit and give you a little backstory as to HOW and WHY we made this happen.

Last year, when my daughter was a third grader, I learned about the Every Kid In a Park pass program, which allows all 4th graders in the US (and their families) FREE access to all federally managed lands and waters - which includes ALL of our nation's National Parks and National Monuments. (To learn more about this initiative, started by President Obama in 2015, click HERE.)

You can actually buy a National Park pass for around $80 so it wasn't a gigantic savings, but what it did was give me the idea.  I had never ever dreamed of doing a National Park Tour before, and then all of a sudden, it was all I could think about.

What a gift this would be to my kids!  We would spend two full months together, outdoors, uninterrupted by work and laundry and toilet-bowl cleaning!

Then came the logistics. Could we do a trip like this in a Prius? Could we afford to take two months off from work? How in hell would all of our camping gear and clothes fit in such a small car? And will my husband's work EVER give him the time off? 

But you never know until you try... so we talked about it like it was going to happen for MONTHS, and then in the late spring, my husband submitted a proposal to his company, and hell if they didn't say GO FOT IT!!  

When we got the YES, we were shocked, realizing that we were really DOING IT! 

We did some rough planning, made a few camping reservations, and then before we knew it, it was time to go.

We're the last-minute type, so naturally we started packing the night before we left. 

We joked with the kids, telling them they could each bring one pair of underpants and that's it... and let me tell you, that's not far from the truth. 

SPACE. WAS. LIMITED.

We did buy a Thule rack for the top of the car so we could jam all of our camping gear up there (1 tent, 4 sleeping bags, 4 sleeping pads, 4 camping pillows, 4 chairs, 4 backpacks), but the itty-bitty back of the car had to hold all of our clothes for multiple climates (hats, fleece and rain gear, along with bathing suits, shorts and t-shirts), our cooler, all of our kitchen gear (plates, cups, bowls, table-cloth, silverware, cutting board, pots, pans, french-press, dish pan, detergent, etc.), our bathroom stuff and our dry-goods/food bin. And our mini pharmacy + first aid kit. And water. And a gajillion water bottles. And my solar shower because I WILL NOT go to bed without taking a shower first. A pile of turkish towels. And a couple of battery-operated fans. And books books books and more books. 

Up until 3 minutes before we left, we had NO IDEA how it was all going to fit. 

And just to give you a little perspective... we allowed ourselves two (2!!) carry-on sized bags... for all of our clothes, FOR TWO MONTHS!!

Let me show you what made the cut for my quarter-section of carry-on space... for better or for worse.

ACCESSORIES

You all know I'm a HUGE fan of earrings, so yes, I brought 7 pairs of them on my camping trip. As far as I'm concerned, earrings are THE BEST way to add BOLD to any outfit when it's hotter-than-hot outside because they don't touch your skin. 

TOP LEFT - Leah Pastrana
TOP RIGHT - Allison Korn Designs
BOTTOM LEFT - Nickel and Suede
BOTTOM RIGHT - handmade by a girlfriend

Leah Pastrana
IMG_2024.JPG
Roots in Silver
IMG_2023.JPG

I brought two light-weight necklaces that can be worn long or layered together for some added fun! 

LEFT - found at an arts-market
RIGHT - Megan Auman

IMG_2029.JPG
Megan Auman

I ALSO brought a couple of leather cuffs... because I LOVE them, and 3 scarves (make that 2, the striped one didn't fit), because there is nothing worse than air-conditioner-neck!  Plus, adding a patterned scarf is a great way to add whim and whimsy to any fit!  

BRACELETS - handmade by a girlfriend
SCARVES - pink polka dots (ebay), pink stripe (purchased in Turkey circa 2004), and the blue chambray is from Aventura Clothing

The Turquoise Tomato
IMG_2031.JPG

CLOTHING

Here's where the picking gets SLIM!

Town / light hiking clothes

  • 5 dresses (3 handmade-for-me patterned dresses + 2 plain colored dresses from Aventura Clothing that were both antimicrobial, which means you can wear them for days and not get stinky!)

  • 1 pair of under-the-dress shortie-leggings

  • 1 jean jacket

  • 1 pair of sandals

Outdoorsy hiking clothes

  • 3 skorts

  • 2 t-shirts

  • 1 hoodie + 1 long underwear top

  • 1 bathing suit

  • 1 baseball cap

  • 3 socks

  • 2 sports bras

  • 1 pair of sneakers

  • 1 pair of Chaco river sandals


Basically, I left my entire closet at home. 

IMG_2039.JPG
IMG_2035.JPG

You guys. Here is everything I brought. For two months. And no space in the car to shop along the road... unless I get rid of something.

IMG_2036.JPG

EXTRAS

PRIORITY ONE - I hadn't spent an entire summer outdoors since doing a backpacking course through Alaska with NOLS (National Outdoor Leadership School) about 25 years ago, and I remember FRYING my skin. Not this time! So, I brought Mom's Stuff Salve day cream + night cream to keep everyone's skin good and moisturized. I also brought their piñon salve because it's super for cuts, bites, stings, scrapes, etc.  (NOTE  - the piñon salve ended up being the BEST most useful thing we packed for our trip!)

PRIORITY TWO - Since I wouldn't be working on my computer or doing any housework at night (now that's a vacation!), I thought I might go a little bananas and do some "light" reading at night.

PRIORITY THREE -  Barr Hill Gin, but I didn't get a picture of that!  (Let me be honest... this was more important than underpants!)  

FullSizeRender (1).jpg

Of course, the husband and kids had their share of space in the carry-on duffle bags, and as it turns out, we did a pretty darn good job packing.

For now, I'll leave you with this awkward picture, taken minutes before we hopped in the car!

IMG_2097.JPG

Love, Stasia 

Screen Shot 2020-02-28 at 4.01.25 PM.png

How I Turned a Too-Tight Crewneck into a Cardigan

Do you know how to sew?? If you do, consider yourself lucky and madly skilled! If you don't... girl, I feel your frustration! I've always thought that because I didn't know how to wield a needle and thread, I couldn't alter my clothes. I thought a needle and thread was the ONLY way to make alternations, that is, until I started experimenting... with SCISSORS.

Do you remember when I turned my too-small-denim-jacket into a denim vest? If you missed that post, you can click HERE and see how easy it was.

And you KNOW I'm always cutting the necks out of my crewneck t-shirts!  Because let's be honest... crewneck t-shirts, in most cases, are not flattering.

Today I'm going to add to my scissor-alteration-repertoire, by showing you how I transformed a too-small J.Crew crewneck cashmere sweater into a cutie-pie-cardigan!

As you can SEE here, the sweater is a wee bit too small for me. Even when I'm perfectly still, my belly is peeking out from under the waistband, so you know that as soon as I move, that thing is gonna pop up like one of those suction-cup-poppers.

AND, the too-tight-crewneck really emphasizes my triangle body shape, making my hips look wide RELATIVE to my torso.


Since I picked up this sweater for FREE at a clothing swap, I figured I had nothing to lose by CUTTING IT IN HALF, to see how it would work as a cardigan!

So that's exactly what I did. With my son's $1 kid scissors.


WAY better, right?

And you know what, when I hand-washed the sweater, the cut-edge just rolled right in on itself.  It didn't fray, frizzle or fall apart.

Not only does the sweater fit my body better now that it's not so tight, but it also helps balance out my proportions! See how my hips look balanced with my torso?

If you've got a too-small tight-knit cashmere sweater sitting in your donation pile, try cutting it in half to see how it might work as a cardi!  I mean, you've got nothing to lose* by trying, right?

Now that I know how successful this little trick is, I'm going to keep my eyes peeled for honey-I-shrunk-the-cashmere sweaters at the thrift store!

And to be honest, I like the cut, raw edge better than I do buttons. It feels a little more gritty/creative/edgy, and I kinda like those feelings!

What do you think? Would you try this trick at home?

xo Stasia

PS. Gals, this is just a little reminder that YOUR BODY IS NEVER THE PROBLEM. I was feeling wicked-hip-heavy in the crewneck sweater, but as soon as I cut it in half, and balanced out my proportions, my hips felt curvy and delicious!  Whoa, right!  If, for even one second, you wish your body were different than it is, then I'd suggest you consider signing up for the next round of Stasia's Style School, so you can put that nonsense behind you, and learn to appreciate and dress your body, just as it is!  

*Any alterations you make are done at your own risk. I shall not be held liable.

How I turned my too-tight denim jacket into a denim vest

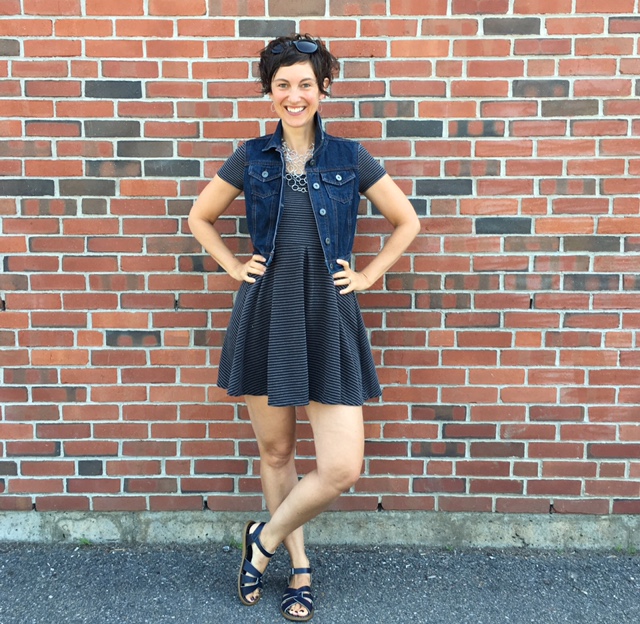
How many of you have a way-too-tight-in-the-sleeves (think sausage arms) denim jacket hanging in your closet? One that you save for occasions when you know you won't have to say, lift up your arms? Here's a picture of me, trying like heck to s-t-r-e-t-c-h out my (relatively new) too-tight denim jacket to MAKE. IT. WORK. But no matter how many awkward praying-mantis type stretches I did, the jacket was STILL too tight.


Since it was destined for donation, I decided to do a little experiment.

I donned a pair of really dull paper scissors (not recommended), cut as close to the sleeve hem as I could, and CUT OFF THE DARN SLEEVES!

No sewing machine. No stitching. Not even a pair of fancy fabric scissors. I just used what I had, and went for it. And I'm totally digging the results.


The denim vest works particularly well on my triangle body shape (torso narrower than my hips and thighs), because it adds oodles of volume to my upper half, creating the illusion of overall body balance!

(NOTE - I am not seeking to recreate a "perfect body". I am seeking balance. The same kind of balance I'm seeking when I arrange decorative pillows on my couch.)

If you're in the market for a denim vest, here are your options:

  • buy a fancy one at J.Crew (HERE) for $70

  • cut the sleeves off a denim jacket that you already own for FREE

  • or buy a denim jacket at the thrift store for a few bucks and then cut the sleeves off

Happy Upcycling!

xo Stasia
How to avoid HANGER NIPPLES

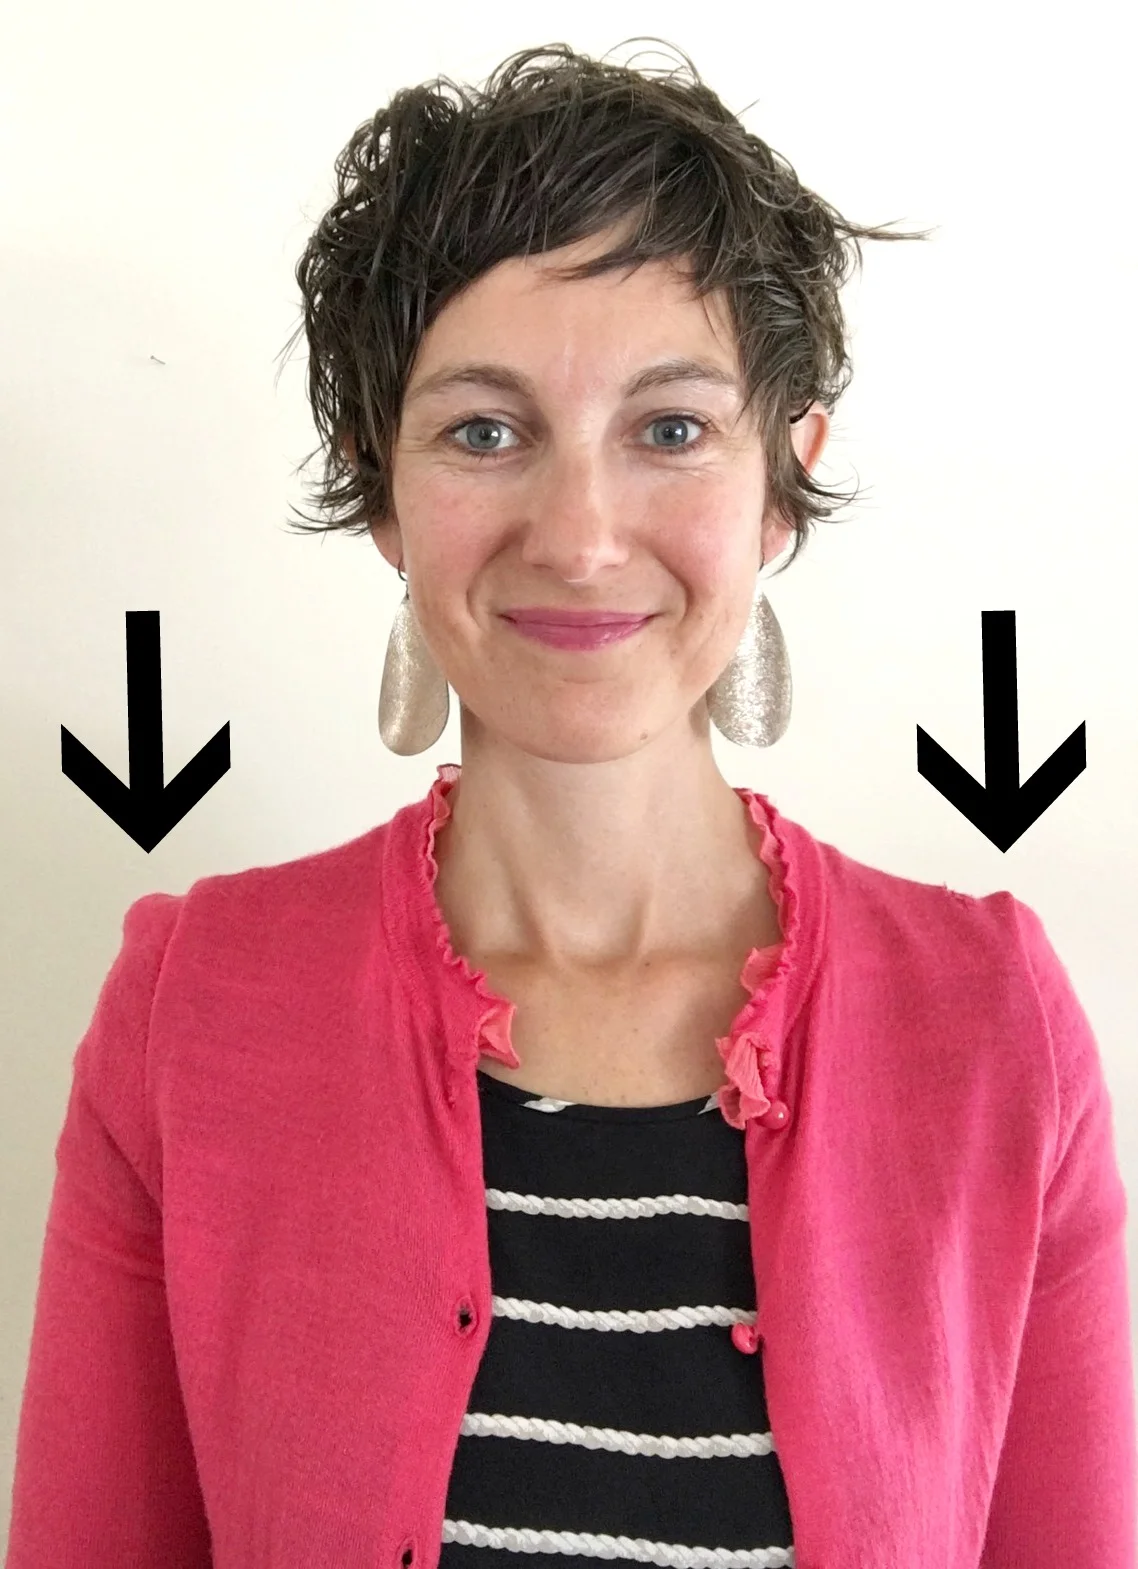
Hanger Nipples. Otherwise known as "Shoulder Nipples". I can't stand them. The way they poke out like that... drives me crazy! You DO know what I'm talking about, right?


I thought I had invented the term, but according to google, I didn't. It's no wonder they have the name that they do, because well, they look like nipples.

My advice around hanger nipples is two-pronged...

First, AVOIDANCE. Second, REMEDY.

HANGER NIPPLE AVOIDANCE.

The bottom line here is this... knits don't belong on hangers. They belong folded up on a shelf or in a drawer.

(In case you don't know, a knit is a textile that results from, well, knitting, like a t-shirt, tank top, sweater or sweatshirt. You can detect a knit by it's stretchability. If it's stretches when you yank on it, it's probably a knit.)

This is how I created the hanger nipples seen above. A few days on this hanger and BOOM. Hanger Nipples. If I had used a metal/wire hanger, the results would be 100 times worse! (Don't do that.)

When you hang a knit garment, it stretches. Not only can you end up with a serious and unsightly case of Hanger Nipple, but the piece itself can actually lose its shape and become droopy if left on the hanger for too long.

All of your sweaters, t-shirts, tank tops, knit-dresses-with-sleeves and hoodies belong folded, in a drawer or on a shelf. They SHOULD NOT be hanging in your closet.

HANGER NIPPLE REMEDY

Hanger Nipples are easy to get rid of, so don't panic. Just machine or hand-wash the piece in question, dry it (either on the line, laying flat, or in the dryer) and then fold.

If you find yourself out in public with Hanger Nipples, or spot a friend with Hanger Nipples, all you need is a little bit of water to tame the protrusion. Wet your fingers, and massage the nipple with your fingers until the nipple subsides.  It won't go away completely, but you can at least tame the beast until the garment can be washed and reshaped.

This is one of those tips you might want to share with your girlfriends. You might even want to share it on Facebook as a Public Service Announcement.

Don't wait until fall is officially upon us to inspect your knits for nipples. If you have any cardigans or long sleeved knit dresses on hangers, remedy the situation NOW so you're ready for the inevitable dip in temperatures.

xo Stasia

PS. Now that you know what Hanger Nipples are, you'll notice them EVERYWHERE!

How to Wear a Hat.

People often ask me how to wear a hat. Or they say something like... "I LOVE hats, but heck if I can wear one". It's a complex issue, and I figured it was time I attack it HEAD on, right here, right now.

Before you click away, convinced that YOU are not a hat-girl, let me ask you this... What would you have done if it were the 1920's and Carson and Mrs. Hughes had invited YOU to their wedding?

SNAP!

You would have found a hat that suited you because there is NO WAY in hell you would have missed THAT wedding!! I mean seriously...

All the women in the cast of Downton Abby have different face shapes, hair styles and body types... and they ALL look lovely in hats. If it's possible for them, it's possible for you too.

What's the old proverb... "Saying you don't look good in a hat is like saying you don't look good in shoes."

So, now that I've proven YOU CAN WEAR A HAT AND LOOK GOOD DOING IT (you just need to find the right one), it's time we talk about WHAT IT TAKES to wear a hat.

To be honest, I'm not sure about all of the how-to-find-the-perfect-hat-for-your-face-shape charts you can find online. I swear my face doesn't fit into any charts, and I'm convinced one must consider more than face shape when buying a hat. But for those of you that are curious, the best resource I found online for finding the right hat for you face shape was HERE on the Goorin Bros website.

Here's MY advice. Go shopping. Try on every single hat you can get your hands on. If you live near a hat shop like Goorin Bros, go there and ask the experts. If you live in small village like me and shopping online is your best bet, then ASK A MILLINER (aka - hat maker)!

That's what I did!

A few weeks back I found fellow Vermonter, Kristen Silverman, a milliner at Silverhill Creative Millinery on Instagram, and messaged her right away and said LET'S COLLABORATE!

All of her hats are HANDMADE, and they are just WOW!

I wasn't sure which hat would work on me, so I asked Kristen, and she suggested a fedora and a cloche.

I could see the cloche, but a fedora?? Am I cool enough to wear a fedora?

I was leery.

The cloche was LOVE at first site. The color was perfect for my skin, the whimsical twirls suited my character and personality, and the style was indeed flattering.


And now, the fedora.

As soon as I put it on, I decided NOPE and took it right off. Then I tried it on again. Still nope. I took it off. I tried it again. Left it on. Walked around the house for a little while. Put on some BOLD lipstick. Added earrings. Then sequins. Checked myself in the mirror about one bajillion times. And then it hit me... I LOVE THIS HAT!


The fedora connected me to that part of myself that is LIVING AT HER GROWING EDGE.

The risk taker. The rule bender. The fierce lover.

The cloche connected me to my fun and whimsy, which is easy and comfortable for me. Like tinted chapstick.

The fedora, on the other hand, was like the first time I wore red lipstick. At first I panicked and said NO WAY, and then after a few tries, I fell IN LOVE!

I AM one of those gals that can wear a fedora!! Who knew!

With Love & Gratitude, xo Stasia

When Tweaks are not Enough, it's time for Transformation.

I'm going to say it again...

"When tweaks are not enough, it's time for TRANSFORMATION."
Saul Kaplan, Business Innovation Factory

Communities. Government. Business. Education.

Yea, of course. But what about STYLE?

I know a lot of you are stuck in tweak-phase. Making little adjustments here and there. Trying to shop, but getting frustrated because you're not sure WHAT in heck to buy.

Another pair of earrings? A new shade of red lipstick? A denim jacket?

You've done tons of tweaking, but you STILL feel like your clothes don't represent your YOU-NESS.

You're still not happy with your body. You're focusing on your growing belly, your mama-stretch-marks and the cellulite on your thighs.

BRAVE... that is something you know is INSIDE you, but right now, you're feeling kind of like a whimpy-pants.

There comes a point when you've got to STOP TWEAKING & START TRANSFORMING.

As far as I see it, you need at least THREE THINGS in your pocket:

Inside-Out Congruency, Body Confidence, Bravery

Unless you have all three of those things, tweaks aren't gonna do you diddly.

Tweaks happen on the outside. Transformation happens on the INSIDE!

Let me show you what I mean...


Ack!

Right before my husband and I left left for the Peace Corps, we did a photo shoot with a local photographer, and THIS IS WHAT I WORE.

ON A PHOTO SHOOT!!!

I didn't have a CLUE about Inside-Out Congruency at the time, and this outfit is testament to that. It in NO WAY reflected my SOUL-FIRE!

That thing that I was doing there... trying to hide my hips and thighs because I was ashamed of my body - NOT WORKING!!

And you see those curved-in, lacking-confidence shoulders? Though I was doing something BRAVE (joining the Peace Corps) I wasn't feeling the POWER of my decision. I approached big change with a little bit of grit... and HUGE amount of trepidation.

STYLE is something I LEARNED.

I spent years tweaking, trying on different kinds of oversized drawstring pants and hippy pendants. And like a true science-gal (my background is in Ecology) I realized a new methodology was needed.

So I invented one, and things changed.


Seeing my own BEFORE + AFTER pictures still blows my mind. The "before" feelings, when I remember them, hit me hard right in the gut. I remember...

  • the frustration and disappointment when I looked at my body in the mirror

  • the sadness and defeat that would overwhelm me when I HAD to go shopping

  • the blow-down fights I'd have with my closet each morning

  • the feeling that I was a freakin' style disaster, no matter how many tweaks I made

  • and constantly feeling misunderstood

Here's a side-by-side, to bring it all home.

Believe it or not... I was around 15 pounds lighter in the BEFORE picture.

HIDING DOES NOT WORK!!

THIS is why I started Stasia's Style School.

And this is PRECISELY WHY Style School is not about TWEAKS... it's about TRANSFORMATION.

And it works.

During the last round of SSS, TRANSFORMATION was the name of the game.

One of our #stylesisters, Michelle, transformed into a mighty force right before our very eyes, and it was A-W-E-S-O-M-E.


Though the pictures of Michelle speak for themselves, I think you need to hear from her directly:

"If I’m really being honest, when I look at these photos, I just see the before side. And I cringe. Seriously. The hair. It’s all I see. Realistically I know you’re looking at both photos... and I’m pretty much hoping you’re looking at the after side far more. So, I’m sitting here trying to get over myself and not dwell on the fact that I’m letting the whole world see something completely unflattering. Nothing like testing my capacity to be real!

What you see when you look at the photos is clothing changes and a new haircut. But the transformation is much bigger than that. You might see it in my eyes and smile. It was soul deep. It’s lessons learned about who I am. About what I was and what I no longer choose to be. It’s about bravery and laughter in the deepest parts. And it’s about community, confidence and caring – both about others and myself.

Wait, you didn’t think Style School could do all that? Well, neither did I. It was the best investment I've made in myself in a long, long time. I’m not sure I could say Style School changed my life. But it did transform me. And I’m the author of that life."

So let me ask you... are YOU ready for TRANSFORMATION?

xo Stasia